I am ridiculously excited to make this posting. I have been working on this project since Mothers day weekend and have had so much fun working it all thru. I never imagined that it would take on a life of its own, but in the end I am so tickled with the final product and hope that you will enjoy seeing it from beginning to end or almost the end as I just cannot wait any longer to show you all.
First let me start with the credit. Of course it started with a pin...ahhh man I love those pins! That pin to Childhood 101 site. http://childhood101.com/2009/12/diy-kids-ice-cream-shop/ Christie Burnett did a wonderful blurb on this lovely little icecream shop that she made for her little one and that is where our story begins!
Oh I was so inspired after I saw that! My brain was churning immediately. Thankfully hubby is a bodyman and has access to BIG boxes. Bless his heart, he came home with a box that was 74"s Long by 28"s tall and 20-3/4"s deep. Standing it on the end was perfect the height and the depth worked as well.
Here is a pic of our cafe before we began.
(My Little Missy is sitting there wondering if Mommy's lost her mind...calling this box a cafe!)

I started by measuring how tall she was against the box to determine how big we wanted it to be. I want her to be able to play in it as long as she wants to...so we made sure there was growing room before starting our cut. Once I decided how tall it would be I set about trying to cut it. It was a challenge to get the lines straight and I wound up using close pins to hold the yard stick so that I could make my lines nice and straight for cutting. Let me say here, arent clothes pins the greatest? I swear I dont know what I would do with out them! I have a basket full that lives in the craft room and I use them all the time...just look at my curtain! lol

As you can see when I took the pic my yardstick wasnt quite straight lol, but I assure you I fixed it before cutting....Measure twice ... Cut once! The box wasnt perfect, there were a few "blemishes" as well as the handle holes. My solution was tape on the inside and glue around it on the outside around the edge to seal it. It did work out pretty well I think. I then took the tape off the inside for painting later. Using the top flap of the box for our door worked out very well. Once it was cut to the size we wanted, I had little miss stand inside. We marked where the top of her head came to, where her eyes were and where her hands would rest. For that I had her face the wall we were putting the counter on and hold her arms to her side with her elbows bent. It worked out perfectly! Then I marked where we wanted our serving window.
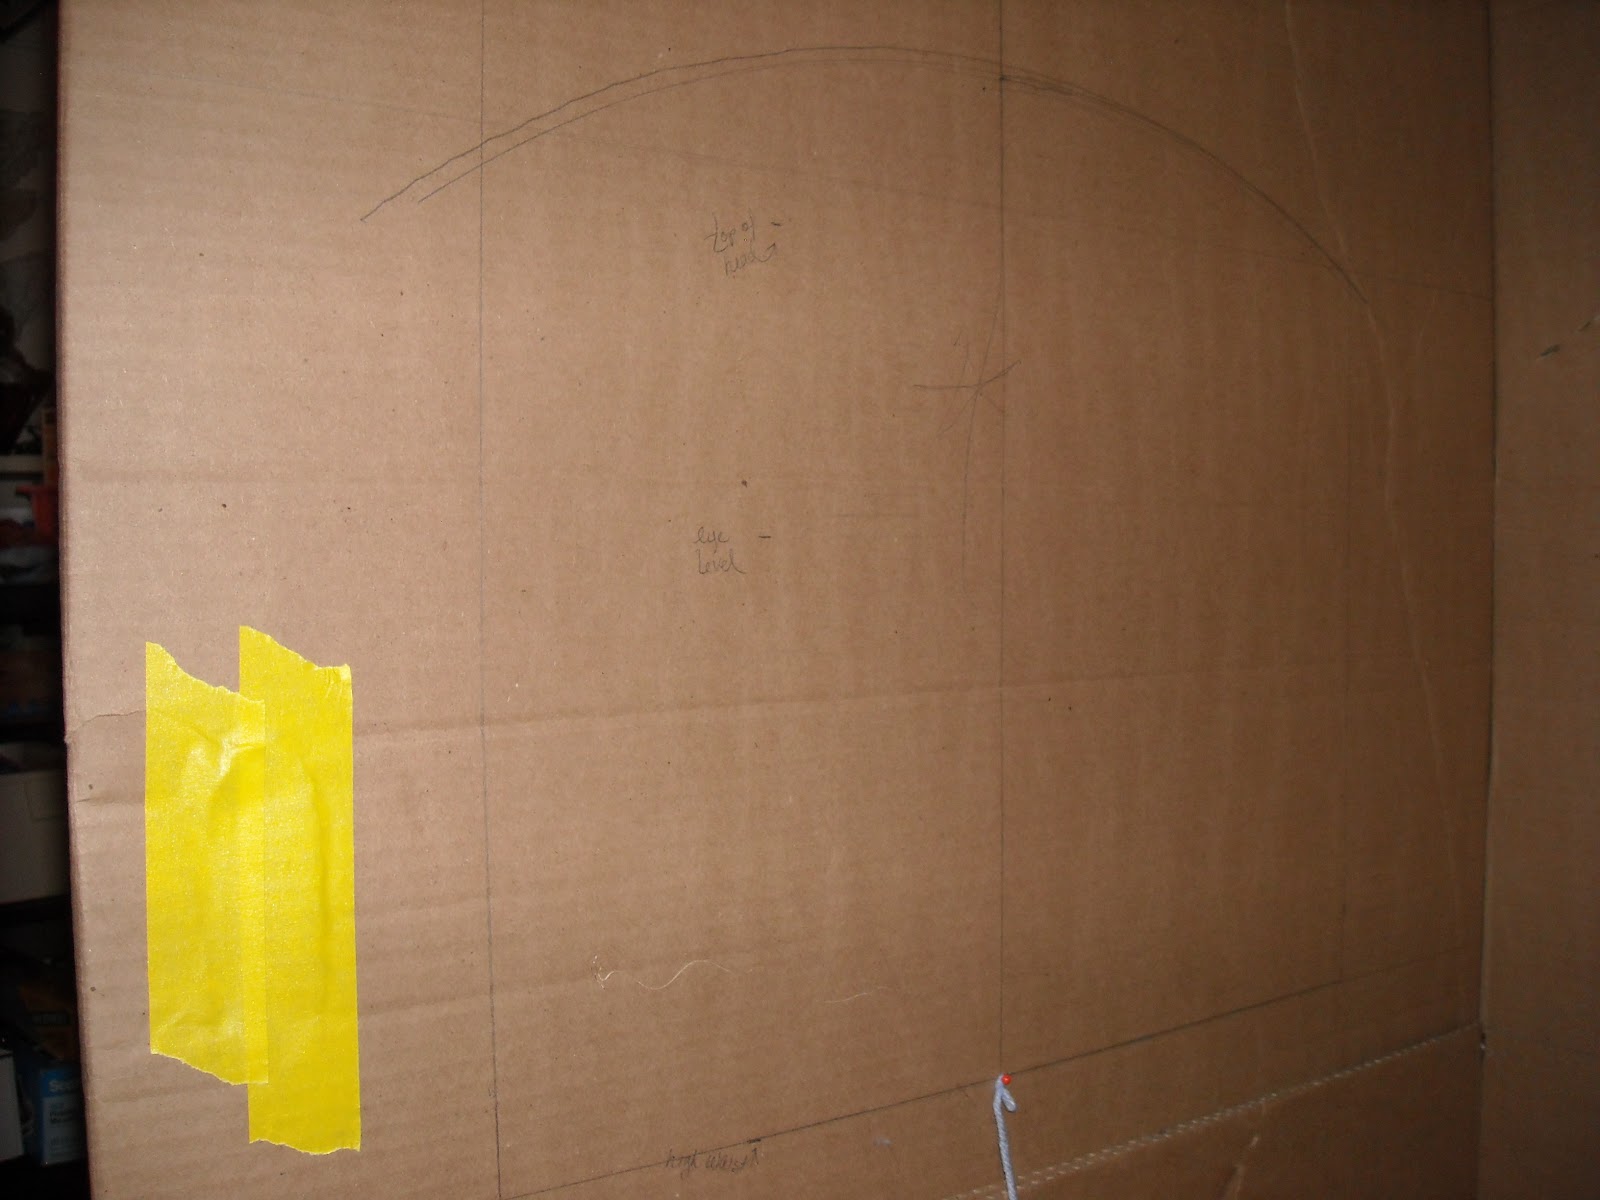

I measured from side to side and found my middle and marked it with a line. From there decided how much of a window we wanted and got to work with my L square to get it marked evenly. I knew I wanted an arch at the top and spent time looking around the house for something big and round to draw around. Everything I had was too small or too big! UGGG. Then the lightbulb popped on. I grabbed a pin, some yarn, scissors and my pencil and made a compass. I stuck the pin in the bottom middle of my window and measured with my yarn from there to the top of where I wanted the window. Cutting the yarn to about an inch past that length so I had room to tie my pencil on. It worked PERFECTLY! I had my arch and I was ready to start cutting.

Imagine a 40+ yr old woman jumping and clapping...that was me after I cut out the window. I was so (am still so...) excited to get started with the fun part. My creative brain was on over drive as I stood there looking at that window...I looked down at the floor where the piece I cut out was laying and inspiration hit me...as it has thru this entire project. Shutters. We need shutters and this cut out piece will be perfect as it gives me the exact size that I need.

I started by measuring the area beside my windows the UNcut part so that I knew how wide to make the shutters. Then as simple as can be I measured and drew the lines to mark off where I wanted to cut.

I used both a box cutter and an exacto knife when cutting. To get thru those first layers I used the box cutter. The box cutter thats probably 60 years or more old. It was one that was in my Grandpa used and I use frequently. There is that comfort from using things like that I think...or at least for me there is. Anyway...
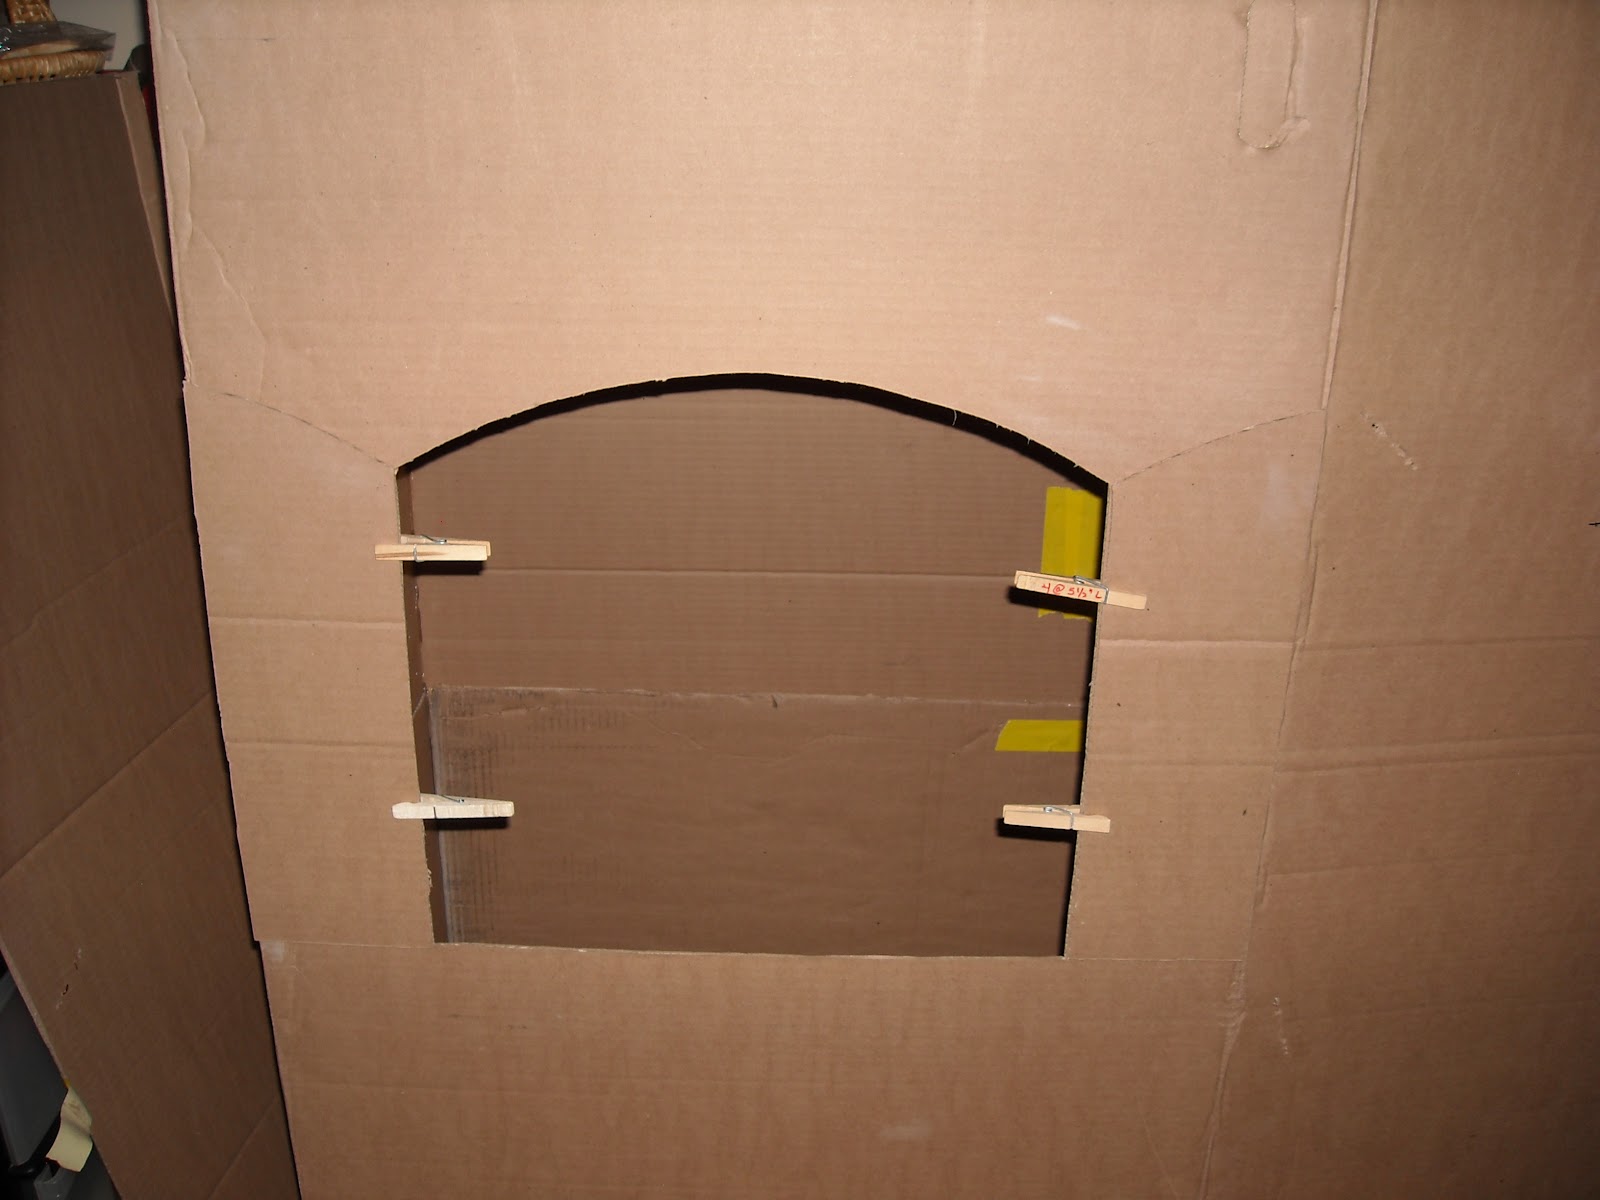

They are a bit hard to see, but the clothes pins are holding them up. Ugg my picture taking skills are not the best. Hopefully you see what I am talking about and in later pics after it is painted you will see better. I promise to get better! :o)
Now here is where I forgot some pictures...I should have taken more but as I worked I got in this hazy zone and forgot that I was trying to document as well as build. At this point the top of the box was open and I hadnt really decided on how to close it. Above the window there was a bend in the cardboard from the way hubby had to fold it down to bring it home. That spot gave me the perfect opportunity to make an angled top. I slit the front sides from the bend to the top and then built the roof over it. I so wish that I had taken pictures but it was so late at night and...I was in a groove! You can see from the next picture sort of what I am describing.


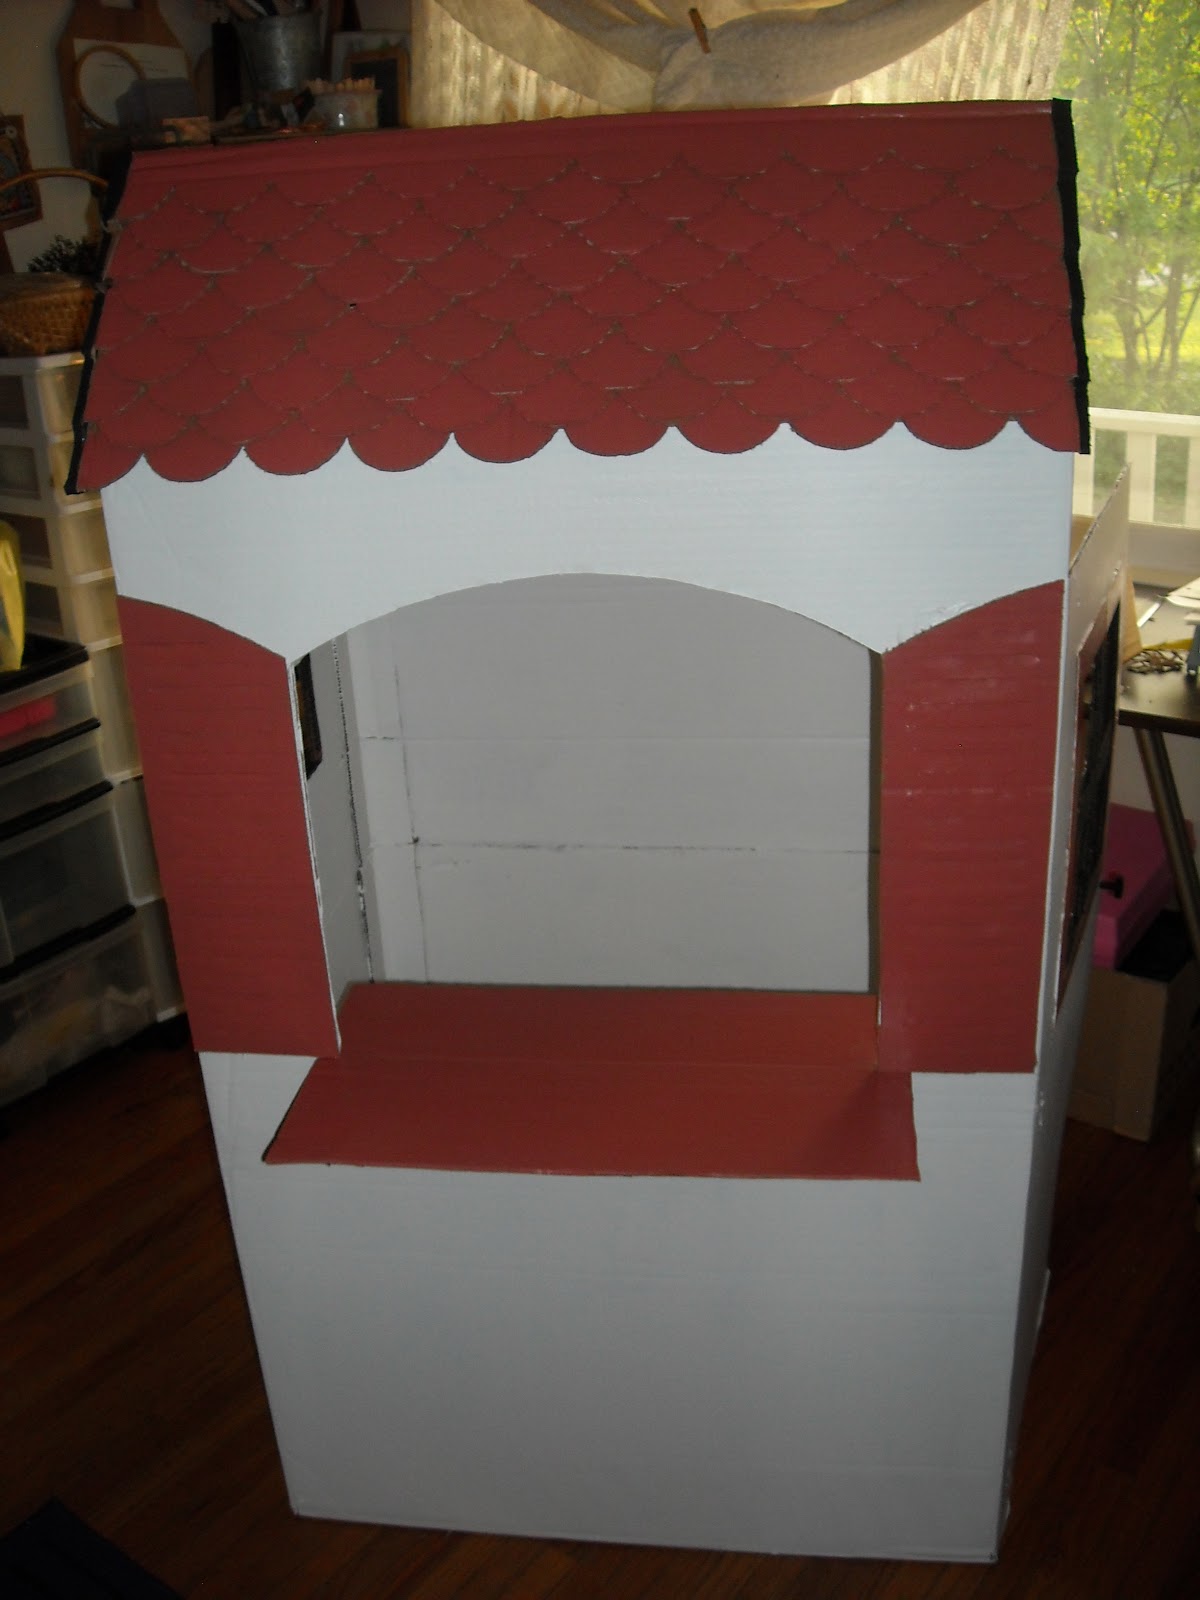
In the blog over at childhood101.com she made this lovely little scallop for the front of her shop...that scallop reminded me of some shingles on a victorian house not far from us. Thats where the shingle cutting and making started. Rows and rows of it. I am now officially a pro at cutting cardboard! The shingles were also a way to cover up the gap that I had in making the roof. It was a win win situation. I also (as you can see) cut the counter and fit it in, using the nifty instructions that were included. I have to say tho...this counter gave me fits. I could see my Little Missy...every time she walked in there for measurments, the first thing she did was lean on that counter and say "Can I take your order Sir?". I knew the way it stood now it wasn't going to be tough enough for her~ I tucked that away in my head to mull over as I cut and cut and cut shingles.

I used a cup from an individual serving of applesauce (I love those cups! we keep them in a bin where Little Missy can reach them and we use them all the time for snacks and crafts!). Because I wanted the shingles off set from row to row I had to make two different types of cuts as you can see in the picture.

Once I had a bunch cut I started gluing them on to see approximately how many I needed...uhh yea I needed more lol. Back to cutting...
As I was cutting I kept thinking about how much time was going in to this. I definitely wanted to make sure that it was sturdy enough for her to play with and not disintegrate after a week. No one wants to see Mommy cry over a cardboard box. That was when I decided that some reinforcement was needed as well. I cut panels to fit inside and glued them in to give the box more support and durability. Then I finished up the shingles and added some sides to cover the raw edges of the shingles as well as finished off the roof.

I cut the sides to flow along with the shape of the shingles. Hard to see here but in later pics I promise it will be easier! That counter top had me in fits...I kept thinking about it and added some brackets to the sides, hoping that it would give it some extra strength. It did help some but I still wasn't satisfied. Back to thinking some more. This one had me stumped. As I pondered I moved on...

I had also been thinking about the shutters. I knew that I wanted detail in them but wasnt sure what. I started with a 1/2" edge around them and then drew lines from side to side (inside of my 1/2" markings). They looked pretty neat but I wanted more. I took my exacto knife and made slits on those lines from side to side and then using a popsicle stick I opened them up. It gave a nice realistic look to them. I will show some close ups as we go.
I was ready to paint! The cans of paint were in the corner calling me and I had to start with some color all this brown was making me nuts! But something Little Missy kept saying was ringing in my head. Each time she would enter the box for measurements...she would say "It's weallly dark in here Mommy...". Me thinks its time for some window action too.

So I cut a window at each end. One in the door and one in the opposite wall. It did give more light and she was happy about that. I framed the windows as well to give some dimension. And yes...I painted! Weeeee! I am a happy woman with a paint brush in my hand let me tell you! I was nearly giddy with happiness at this point. What a fantastic way to spend my mothersday weekend! Daddy was with our girl keeping her busy so Mommy could play. What a good guy.

So I continued to paint...

and paint...
and paint some more....

One thing I want to point out is the top. You can see from here how I contoured the cardboard side to run with the shape of the shingles. I have to say that was fun to figure out how to do it and I was happy with the result.
I kept thinking about that darn counter. This really was niggling at me, while I wracked my brain for an answer I decided to put in yet a third window at the back and added frames to the inside of the windows too. I really didn't want her concerned about the dark and I wanted to make sure she could see out no matter where this cafe ended up. Then it hit me on how to reinforce that counter top. Add another layer and a solid base around it. LIGHT BULB!


I totally encased the counter that I already had there. I found that I had an extra piece of the shingle that didn't get used so it became the front. While building this I had some raw edges exposed on the corners and while I did sand them they still looked raw. I took some strips of card board and removed on side of it. So all that I had left were strips of the outer layer. I used that as a seam cover....which would have been a great solution if I stopped to think about it more. I was using hot glue which worked great for nearly every part of this project...but here where I really needed it to be smooth it wasn't. ACK! My lovely counter top with lumpy bumpy edges rather than raw edges. Sigh. I thought that painting it might help...so I did and it didn't and I was so disgusted with it that I let it sit for a few days and didn't even take a picture of it. I know what you are thinking...for cryin out loud...its a cardboard box! I kept telling myself that but it didn't work.
I took a couple days and did some other fun projects. I took a saw table that my dad made and turned it into a garden bench. It was one of the last big things he made and its imperfections are so dear to me. I know that he would be so happy that I am using it and that is such a great feeling. Little Missy and I got in to some mess too...we tried another pin project...colored shaving cream...but we painted on the sidewalk with it. OH how fun. Shaving cream is our new big thing we love to play with and she even likes it just plain old white too! But back to where we started...in creating this lovely gardening bench for myself, and cleaning out part of the garage I came across a piece of thin white plastic. My dad was a sign maker and I am sure that it came from him, but for the life of me I don't know when. It could have been in the garage for years and I never would have found it if I hadn't been in there cleaning. It didn't hit me right away. I finished cleaning the garage and stood that piece of plastic up with some other boards that I have out there and went back to life. Two days later it hit me...after avoiding my craft room for several days because this counter was ticking me off...I put on my big girl panties and went to look at it again. When I painted it, I used the same color as the shingles and the shutters...it was way too much of that color so that was part of what was bugging me. Then for some reason that plastic popped into my head....could that be the answer? YES! I hear the choir singing the Hallelujah Chorus!


The plastic was thin enough that I was able to cut it with a pair of sharp scissors and sand down the sharp edges. As you can see I painted the bottom black and I think that really worked well. I can honestly say I am thrilled with the result. Thank goodness I never throw stuff away, it is finally paying off! LOL
Now to the nitty gritty. So how much did this cost me?
Cardboard: FREE bumper box
Paint: FREE I received this paint years ago from a fellow freecycler!
Plastic for counter: FREE found item in garage
The ONLY purchase for this was the hot glue.
I had about 10 short sticks on hand when I started and we bought a large package on our next visit to Walmarket.
Total investment for hours of fun:
$4.74 + tax
!!!!!!!!!!!!!!!!!!!!!!!!!
I cannot even tell you how proud that makes me. To be able to make something for my Little Missy that she will enjoy and recycling at the same time! Man, it just doesn't get any better than that for me!
I still have some more details to finish on this. I am going to make some thing to put her bowls and things on, just haven't totally figured that out yet. Also making a chalkboard sign for the front of it so that the special of the day can be changed. I will of course share the those when I have them finished. I simply could not wait any longer to share this with you!
Thank you Christie Burnett for your inspiration.
Remember everyone...your trash CAN be treasure if you just look at it differently.
Recycle something today.
Wow! What work went into this...it's beautiful! I'm sure it will last a long, long time! How fun! Thanks for the sweet comment you left on my blog.
ReplyDeleteWell thank you! You are my first official comment! This was a really fun project and as you can see I really got into it. :)
DeleteI just added some shelving storage to it and will be updating this post soon. Waiting for my Little Missy to wake from her nap so that we can play in the sand.
Have a wonderful day and Thank you so much for stopping by and commenting, it really means the world to me.
This comment has been removed by the author.
ReplyDeleteThat looks amazing! Really love the details like the shingles and shutters. And I'm the same way about having a hard time throwing things (especially great cardboard boxes) away. : )
ReplyDeleteThanks so much Jenn! My mind just buzzes with ideas right now, all this cardboard has me going. Hubby likes it so much that I already have another box sitting in the garage waiting for me LOL.
DeleteIn this society of buy it and toss it, I am so tickled to see so many others that are recycling aware. Each thing we save from the landfill is a bonus. As an older mother, I really wonder where the earth will be for my Children and grandchildren. Its frightening.
Anyway watch for an update on this. I have added some storage to it that I will be posting (hopefully today if I can stop looking at cardboard playhouses lol)soon. :)
Thanks for your comment, its so exciting to see them!
WOW! I'd say you surpassed me on this one! How fabulous!! ...and thanks for your sweet comment!
ReplyDeleteSurpassed? Nah...just got totally addicted lol. It was like a fever that got worse! It was and is so much fun. I have always been a crafter but for several (probably 7 or more) years I haven't felt inspired like I do now.
DeleteAll of you wonderful folks that have this whole blogging thing figured out already are my inspiration and my hat is off to you! Thank you for helping me to find my groove. :) Thanks too for stopping by and commenting!